Equipment and materials
This list may look long but very few things here are essential. This is just based on what I use. Almost everything can be swapped out something else. Read all the alternative workflows in the tutorial before buying anything.
A computer

The Artist's Helper can run on Macs, Windows-PCs or Linux boxes (probably). They must have a keyboard and a mouse or trackpad. It won't work on tablets. Sorry.
A digital camera

Preferably a DSLR or a MILC with a manual mode, but a compact camera or the camera on a phone will do. The application can do its own white balancing and stuff.

A printer Optional (ish)

With paper and ink and whatnots. For transferring generated sketches and outlines to the canvas.
 Or maybe you could use a digital projector instead. I haven't tried
myself but I'm sure a smart person like you could work it out.
Cables or WIFI connectivity for the above
Hopefully you have the things above or their equivalents already, right?
And you know how to get them to talk to each other, don't you?
Imaging Edge remoteand have the images automatically transfered and loaded into the application. It is a lot quicker than using the camera's WIFI.
Paints (Obv).

Some acrylics or oils or both.
gwash, opaque watercolours) but I'd like to. The ability to re-wet and re-work it sounds good.
Acrylics
Acrylics dry very fast. They are water soluble which makes them easier to manage and to clean up. Once varnished, finished paintings can be difficult to distinguish from oils.
The fast drying times makes them great for quickly blocking in the initial base layer and then applying glazes to modify each area iteratively. Each layer can be ready to paint over with the next in under an hour.
painterly. Retarding agents help but they can make the paint feel sticky. Stay-wet palettes and water spray bottles also help but it's still not ideal.

I recommend getting something like the Liquitex BASICS 6-Piece - 4 oz (118ml) Starter Set. The nice large tubes will help us to be bold in our mixing and painting.
You can get them (it?) online at Michael's, Dickblick, Walmart or eBay
 Originally I bought box of 24 colours in 22ml tubes tubes but I've
not used many of them. I have more fun mixing my own from my
favourites. The teentsy little tubes made me too timid. I like splurging it
out from big ones (fnarr). My collection of 118ml tubes has gaps
at magenta and cyan so I occasionally dip into these.
Hardware store paint. 
Oils The king of all paints

Oils tend to be a little more expensive than acrylics and can be a tad more finicky to use but their slower drying rates make them easier in many respects.
opentimes allow more control.
closedsurface to protect the paint but a quick Google search lead me to believe it's ok and I've not had any problems yet.
dry. They don't dry well in the dark or the cold either.
I recommend water miscible oils (WMOs). These are water
soluble
not water based
, an important distinction. They are
regular oil paints that are modified with an emulsifier. This
enables them to be thinned with water and cleaned up with soap and
water so you don't need any nasty white spirit / mineral
turpentine.
stickythough. I've heard good things about Royal Talens Cobra and Lukas Berlin WMOs so I'd like to try them next time (despite their ugly packaging).
Miscible (mixable) isn't the same thing as soluble (dissolvable).
White spirit[s], mineral spirits, mineral turpentine, petroleum spirits, solvent naphtha, or, generically,
paint thinnerare all the same thing (petroleum-derived).
But they are not the same thing as distilled spirits (distilled directly from fermented grains and fruit) or true turpentine (distilled tree resin).
OMS may be safer than mineral turpentine but it's still not entirely safe.
WMOs are much less dangerous than WMDs but are also still not entirely safe.
Brushes

You'll probably ruin a lot of brushes at first with so start cheap and only go for quality once you know what you're doing.

How insecure would you have to be to think you'd need them?
Supports

Painting surfaces are known as supports or substrates. (Oh, la de da, aren't we posh). You can paint on a wide variety of supports: stretched / wrapped canvas, canvas panel board, hardwood panels, paper, cardboard, walls, sleeping friends…
To start with just get a canvas paper pad. They come in a variety of weights. The heavier ones are almost like a pad of canvas boards.
The lighter papers are great for sketches, experiments, swatches and colour charts.

Individual canvas panel boards are good too. I like that you can use pins to hold your sketches and then hide the holes later with a few blobs of paint.

Stretched or wrapped canvases make you feel like an authentic artist.
Kitchen roll and rags


Lots and lots for wiping your brushes and palette knives. Also, no matter how careful you are, you will get in a mess at some stage.
Transfer paper Optional

It's not essential but transfer paper can help you transfer your sketch from print outs.


 If you are made of money you could get an artist projector instead.
But I'm not so you'll be on your own and you'll have to figure it out
yourself.
An easel Optional

An easel helps make you look and feel like a real artist.
 All the easels I could find seemed a little short so I found some
strips of wood and gaffer taped them to the legs to extend them.
temporary fixworked well so it's now the
permanent fix.
A mahl stick Optional

A mahl stick is held with your off-hand to provide a rest to steady your painting hand.
They really help make you feel the part.

I may have to get a beret too.
A palette Optional (ish)

Beware the treacherous lies of the left handed palette.
A surface to mix the paint on.
- wood
- the classic wooden palettes make you look cool but are hard to clean
- glass
- easy to clean, easy to can change the background colour to match the toned canvas (imprimatura), fragile
- paper
- no need to clean
- plastic
- Sta-wet boxes to put other palette types in
- old frying pans
- cheap, easy to clean, feel very steampunk

If you want to spend a little more the ParallelPalette looks interesting. It's The artist David Kassan ran a successful Kickstarter campaign for it in 2015.
Palette layout
There is no right or wrong way to lay out colours on palette. Matthias Schaller has photographed the palettes of many famous artists.

David Briggs: Linear systems from Aristotle to Newton
- white
- yellow
- red
- violet
- green
- blue
- black
Palette knives Optional

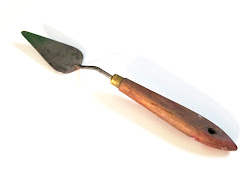
A blunt knife or trowel primarily used for mixing paint.
A stay wet palette Optional

For when I use acrylics I got a Masterson Sta-Wet Palette(sic). Surprisingly effective. It's basically a tray with a damp sponge at the bottom, some absorbent palette paper to mix your paints on and a lid.
A spray bottle / mister Optional

When working with acrylics it's good to have an atomiser bottle
filled with water on hand. You can spray your palette and your canvas
to keep the paints open
(alive and workable).
Workable fixative Optional

Spray over sketches and transfer paper tracing lines to prevent smudges or have the lines bleed though paints placed on top.
Acrylic gesso Optional

Used for priming painting surfaces. I don't like painting onto a plain white surface so I mix some paint in first. It covers well so it also allows you to give up on a painting, cover it (mostly) and start again!
Mediums Optional
Mediums for acrylics

Allow you to dilute acrylic paints to make glazes without losing the consistency as you would with water. They can make paint thicker, thinner, textured, levelling, glossy, matte and more.
Mediums for oils
To change the handling properties of oil paints.
Paint fat over lean
to prevent craking. Lean with thinners
for fast drying for the early layers, fatten with oil for slow
drying for the top layers.
Retarder Optional

A few drops of retarder will slow the drying time of acrylics considerably.
Foam brushes Optional

Because they're fun somehow. I use them for my oiling in.

A tripod Optional

It's also really nice to have a tripod (or a phone stand / selfie stick). It can save quite a bit of time when taking and aligning canvas photos.
Lamps Optional

I also have a couple of lamps on stands to provide consistent lighting, but I'm sure you can get away without them.
A colour checker Optional (highly recommended)
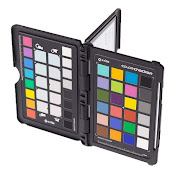
X-Rite ColorChecker Passport or similar. In order to perform proper colour correction in the application it's best to include known standard colours in the photo.

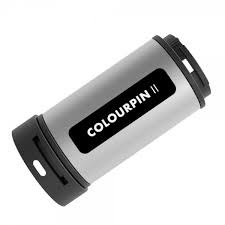
I scanned the greyscale segments at the bottom on mine with the Colourpin and got the following:
| #3e4241 | #5d6262 | #818483 | #acafaf | #d4d7d6 | #fefcf7 |
Alternatively you could find some widely available things with consistent colours and ask some nice person with a colourimeter to measure them or similar ones available to them.
 I've got a NCS Colourpin II (a poor mans colourimeter). I'll publish
some values for some common paint manufacturer swatch cards when I
get a chance.

BREAKING NEWS...
I've just found this cheap little Gray Scale & Value Finder which is perfect for colour balancing.
I scanned the segments with the Colourpin and got the following:
| #494643 VALUE 1 |
#eff0ec VALUE 10 |
|
| #615f5e VALUE 2 |
#dddfdc VALUE 9 |
|
| #777776 VALUE 3 |
#cfd1ce VALUE 8 |
|
| #8a8b89 VALUE 4 |
#c0c1bf VALUE 7 |
|
| #9c9d9b VALUE 5 |
#adaeac VALUE 6 |
If their print quality is consistent you should be able to use the same values with your colour correction filters.
More brushes

stock photo by Lia Leslie
Because you let the first lot dry out, didn't you?!
More kitchen roll and rags

stock photo by Alice Achterhof
…but I suspect if I wait long enough no staging will be required.
Footnotes
…but the spelling is in British English (aka. English) because that is where I'm from.


No comments:
Post a Comment
Talk to me